
Raijintek Paean Premium ATX Full Tower Case Review
Hardware Installation & Performance Evaluation
Contents
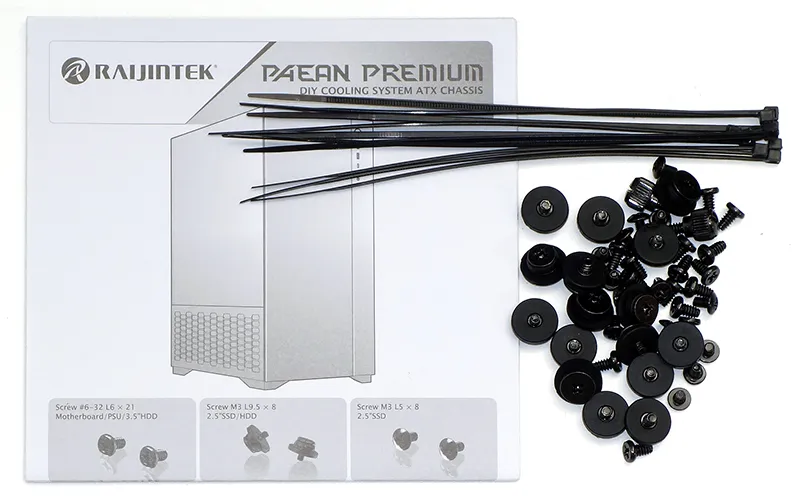
The Paean Premium installation kit includes enough standard screws to install a motherboard and power supply, enough shoulder screws to install two 3.5” or two 2.5” drives, a few spares, some cable ties and a manual. Figuring out which of the drive screws are 6-32 thread and which are M3 thread is a matter of using your eyeballs (and perhaps reading glasses if you’re over 30).
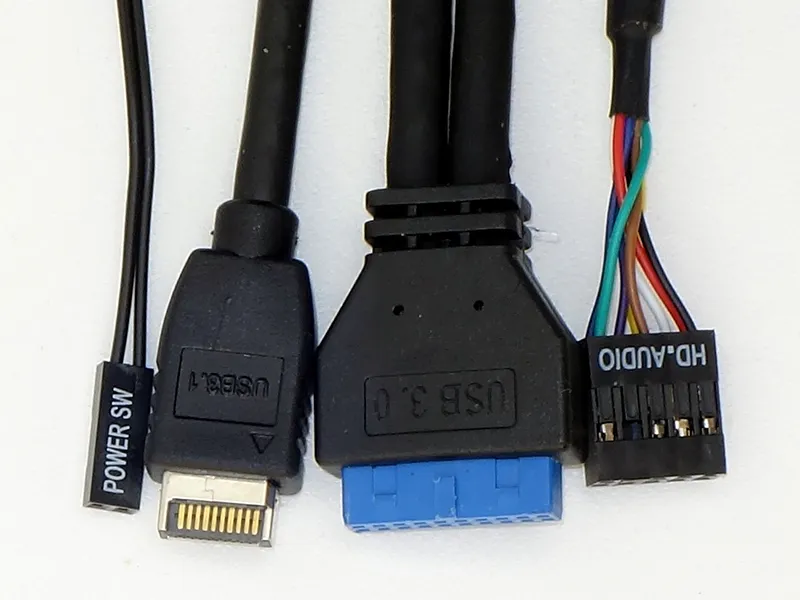
With no reset button or indicator lights, connecting the Paean Premium to a motherboard couldn’t be much simpler. Leads include a power button, a USB3 Gen2 for the Type-C port, a USB3 Gen1 connector for the Type A ports and an HD Audio for front-panel headset jacks.
Our Build
Since the Raijintek Scylla Pro installation is somewhat complicated within the Paean Premium, Raijintek sent us a set of its RAI MF0906 90° G1/4 adapters and a few extra PELIAS D140906 elbows.

This is where we have to break a few hearts: First of all, the Paean Premium’s side panels have no finger holds on the back edge, and our sample case was delivered with its right side panel jammed so tightly during shipping that we had to put a screwdriver shaft through a side vent hole and yank it backwards to get it unstuck. Second, we had some difficulty getting the top tab of our graphics card through the case’s card tab hole, since the lower tabs of our graphics card hit the motherboard before the upper tab cleared that hole:
Most enthusiast-class motherboards have some kind of plastic cover in the same area as ours, so Raijintek should have known better than to make the access hole this small. The presence of either some kind of cover or several audio capacitors in this area is why most designers have increased the size of the slot tab hole over the past two decades. As for the severity of our problem, we first broke the PCIe latch off our motherboard during the installation, and were then forced to pry the sheet metal above the hole backwards in order to remove that card. Your luck will depend upon which parts you choose.

Since the fittings of a ‘360mm’ radiator are positioned forward of the opening in the motherboard chamber’s floor, we connected two fittings in a zig-zag pattern to provide clearance. Our first attempt failed as the tubing slid apart during initial testing. Since we didn’t have enough coolant left over to refill the system after fixing our installation, we were forced to top the reservoir with distilled water.

The system worked perfectly after all of that, though the draining and replacement of coolant left some unsightly water rings inside of the ANTILA DDC EVO RBW’s spectacular glass reservoir. We’ll need to clean that before our next installation.
Test Results
| System Configuration | |
| CPU | Intel Core i9-12900KF: 16C/24T, 3.2-5.2 GHz, 30 MB L3 Cache, LGA 1700 |
| CPU Cooler | Alphacool Eisblock XPX CPU, VPP655 with Eisbecher D5 150mm, NexXxoS UT60 X-Flow |
| Motherboard | ASRock Z690 Taichi, BIOS 1.43, LGA 1700 |
| RAM | Corsair Dominator Platinum RGB CMT32GX5M2X5600C36 DDR5-5600, 2x 16GB Kit |
| Graphics | Gigabyte GeForce RTX 2070 Gaming OC 8G: GeForce RTX 2070 |
| Hard Drives | Toshiba OCZ RD400 256GB NVMe SSD |
| Sound | Integrated HD Audio |
| Network | Integrated Gigabit Networking |
| Power | be quiet! Dark Power Pro 10 850W: ATX12V v2.3, EPS12V, 80 PLUS Platinum |
| Test Configuration | |
| Load Software | AIDA 64 Engineer Version 6.00.5100, Stress CPU, FPU, Cache, GPU |
| H/W Monitoring | HWiNFO64 v6.28-4200 |
| SPL Monitoring | Galaxy CM-140 SPL Meter: Tested at 1/4m, corrected to 1m (-12 dB) |
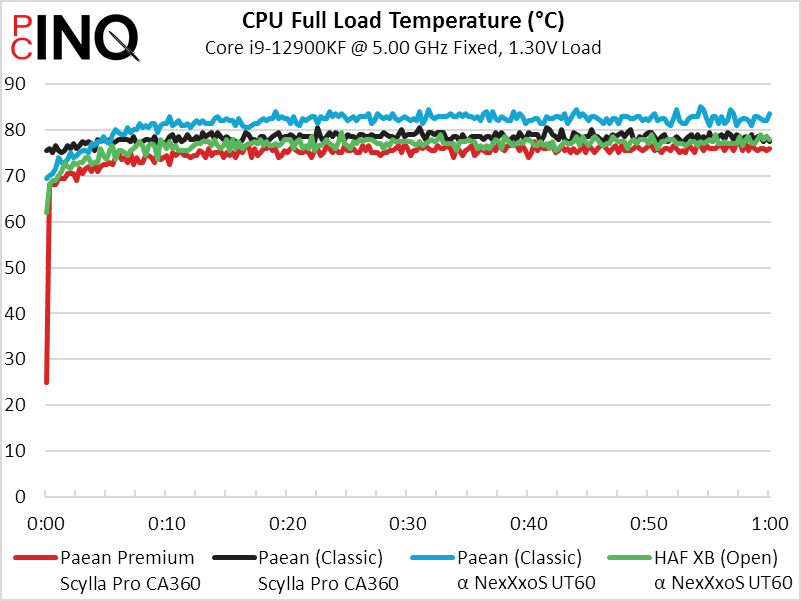
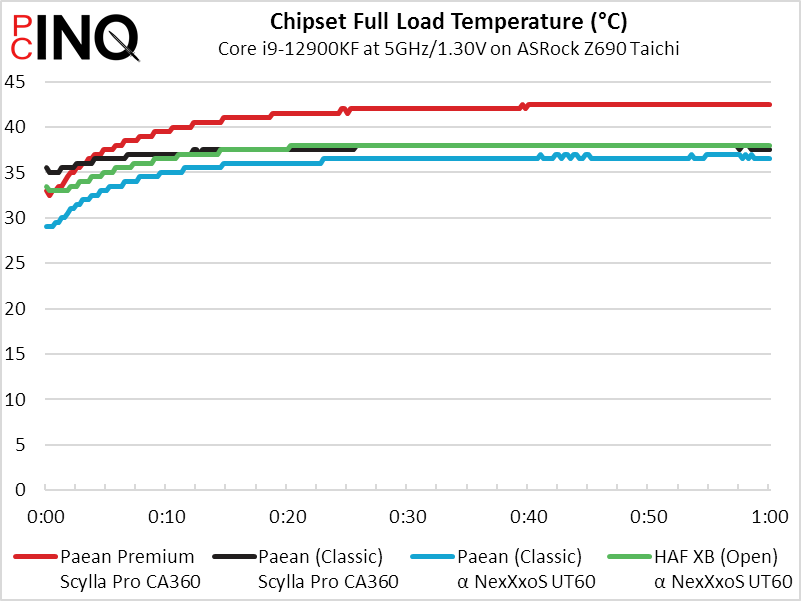
Thanks to its radiator being mounted below any heat sources, the Paean Premium beat all comers in CPU temperature. Thanks to its fans being mounted nowhere near the motherboard, it lost to all comers in those tests. The alternative of mounting the radiator on the top panel for better voltage regulator temperatures would have made it harder to bleed air from the system.
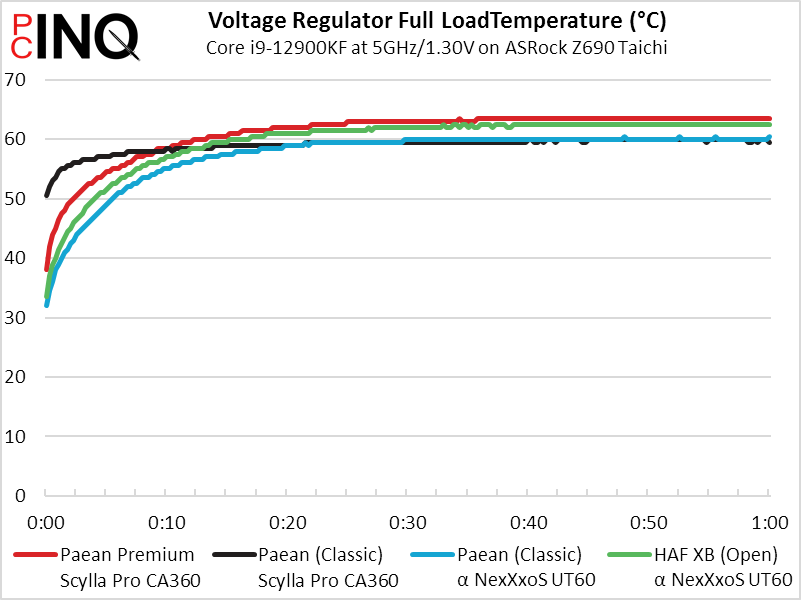
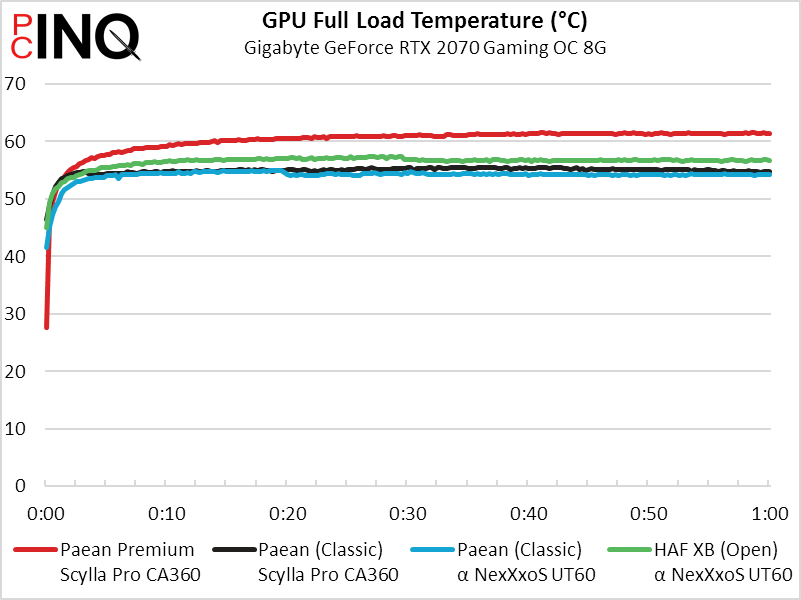
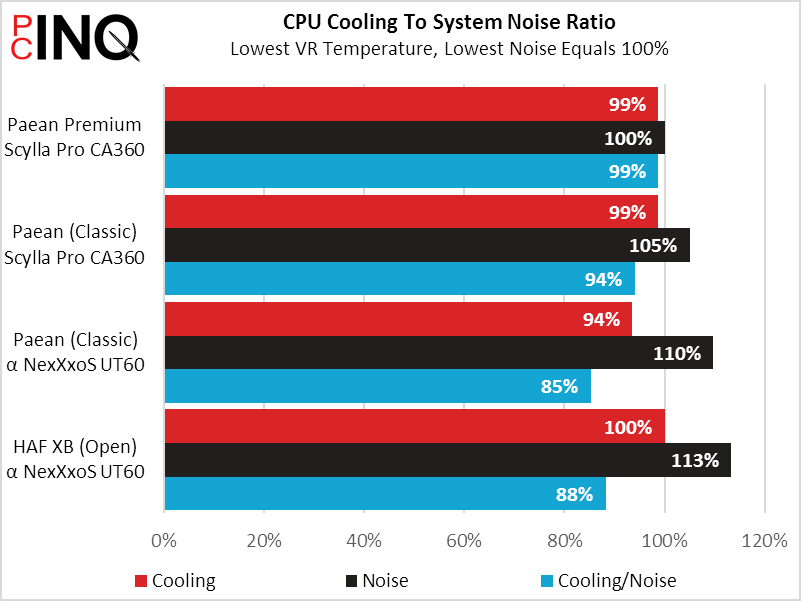
Our graphics card produces the majority of noise while running at 100% in this test configuration, and the Paean Premium’s glass panels did an excellent job of blocking that noise. On the other hand, using voltage regulator temperatures to evaluate case thermal performance has some negative impact. We’ll accept the blame for that last part, since there are many options for fan placement in the Paean Premium.

One other thing we should note is that while the Paean Premium has mounting places for five 3x120mm radiators, mounting one to the floor of the motherboard chamber would block any reasonable pathway for coolant lines to reach the lower chamber. That realistically limits most builders to four so-called ‘360mm’ radiators, though it would be possible to rout coolant lines past the upper end of a ‘240mm’ radiator mounted in that position.
| Raijintek Paean Premium | |
| Pros: | Cons: |
|
|
| The Verdict | |
| The Paean Premium offers great flexibility for multiple radiator placement to those who can come up with excuses for its inexcusably designed expansion card tab slot. | |
We love the Paean Premium but are quick to offer reasons why you shouldn’t: The card tab slot sizing problem is particularly atrocious, since most high-end motherboards (including our ASRock and Asus samples) have components that raise a graphics card’s lower tab enough to prevent its upper tab from going through the access hole. You might even end up like us with a broken PCIe slot latch. And that’s assuming you can even get the case open, as it has no finger holds on the rear edges of the side panels that you could grasp if the case gets delivered with one of its side panels jammed. But once you get past those issues, fitting all of your enormous cooling components becomes a delight!