Connecting Your Motherboard’s Front-Panel Header, Demystified
The Long-Standard Front-Panel Connector
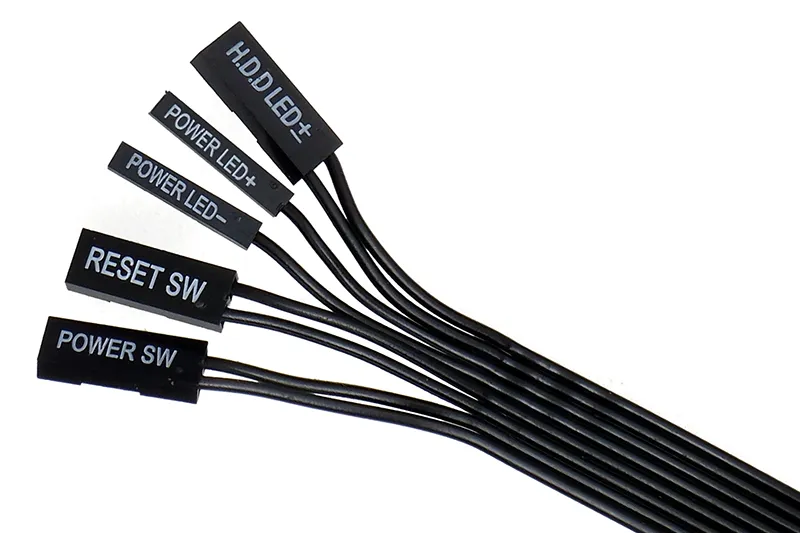
Front-panel button/LED connectors have troubled builders for as long as build-your-own PCs have existed, but the biggest struggle for experienced builders is watching as those with less experience dole out bad advice. Most of those struggles are needless, since most manufactures have since adopted the Intel front-panel header standard first published in the late 1990s.

Intel’s nine-pin header is “keyed” by leaving out a single pin on right side of its upper row, which is opposite of the lower row right key pin of the similar USB 2.0 header. There’s little to fear here, as LEDs are polarized and simply don’t function if connected backwards. Power and reset buttons bridge their two pins so that polarity isn’t important. After doing several of these, we’ve learned that the text printed on LED connectors usually faces down (ie, the positive pin is usually on the left when the text is facing down).

A few builders even luck out to find a single-lead “F_PANEL” cable on their cases (InWin labels these EAD015). This is not a mistake and is not USB: Using it does not require a breakout adapter…unless you have an oddball motherboard as we’ll discuss below. The hole that corresponds to the missing pin is normally plugged or blocked out to prevent it from being inserted the wrong way.

The Short Story
Intel introduced its ATX front-panel connector in an era when most cases were designed to support motherboards of both the ATX and its predecessor, Baby AT form factors. Here’s what an AT cable set looks like:

Baby AT motherboards had a power LED connector with 3-pin spacing, whereas Intel used 2-pin spacing. Because of this, early consumer ATX cases usually came with a Baby AT compatible power LED connector. But that’s all behind us now.
Asus Turned Around And Came Back
Asus was one of the first third-party manufacturers to support Intel’s front-panel header back when the wiring of most cases didn’t. Builders complained and Asus went back to its original non-standard front-panel header, waiting a few years before reintroducing the Intel layout on an extended front-panel connector that also supported legacy cables:

Notice that Intel’s 9-pin pattern is found on the left side of Asus’s current header, and that an additional section to the right of those standard pins now includes a legacy (AT) power LED pin set and a PC Speaker pin set for beep code diagnostics.
Gigabyte Does Extras, Too

Gigabyte uses the Intel standard for the left side of its connector, but with the no-contact pin repurposed for those who need a chassis intrusion header. A one-piece Intel-spec front-panel cable still fits its left side. As with Asus, speaker and redundant power LED pins are positioned to the right of the standard section.
ASRock, MSI…even ECS, EVGA, Colorful, and NZXT!


Every major player has been onboard with Intel’s front-panel header for many years, along with a bunch of lower-volume brands. We even checked some old Sapphire and Abit boards and still found the Intel 9-pin front-panel header! In fact, Supermicro is the only remaining brand we’ve worked with that does not use at least the eight connected pins of Intel’s 9-pin front-panel connector, since the firm decided to put all of its ground pins on a single row.
But what about Biostar?
Biostar introduced Intel’s header in 2020 with its Z490 motherboards. The last well-known brand to make the switch, its X570 motherboards were unfortunately designed before that transition. Since those 2019 models are still being sold as current, we find it important to detail this exception:

Notice that the eight required pins pushed up against the right edge of the connector are in the same order as Intel’s standard header. Normally we’d recommend hanging the right-edge of a one-piece front-panel connector off the right edge of the front-panel header, but Biostar chose to place a plastic frame around its front-panel header.
Using a case with a one-piece connector means hoping that there’s enough space between the plastic frame and front-panel cable to hang it past the right edge. Less attractive options include trimming off that connector’s key pins (which you’ll never get back when you upgrade your motherboard), trimming off the right edge of the plastic shell (voiding your motherboard warranty), or buying a breakout adapter for your front-panel cable.
Other Front-Panel Connections
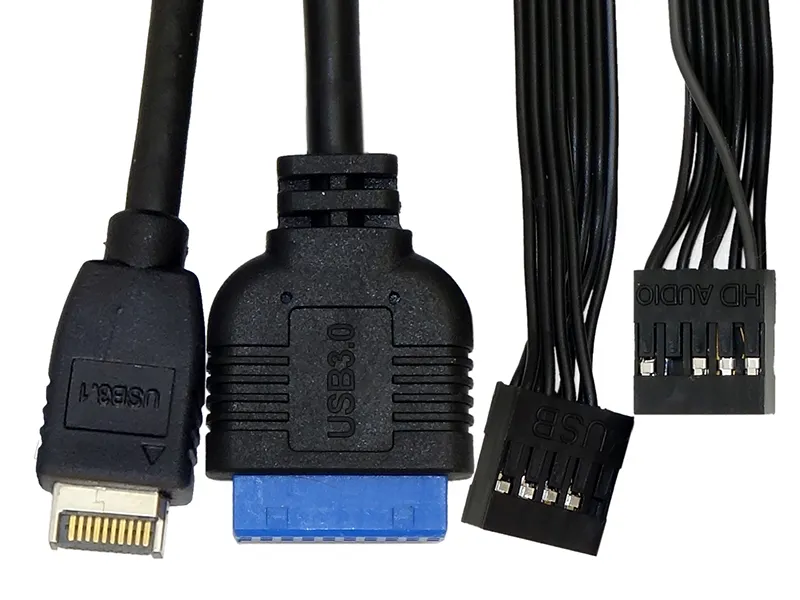
USB ports and audio jacks are served by the other standardized front-panel connections. From left to right are Type-E (Gen2) and 19-pin (Gen1) USB3 cables, USB 2.0, and HD-Audio. The Type-E connector is keyed on the outside with metal tabs on its edges so that if it can’t plug in one way it will the other, the Gen 1 connector has an external plastic key tab in the middle that fits into a corresponding slot on the header’s outer shell. Though they appear similar to a one-piece front-panel connector the nine-pin USB 2.0 and HD-Audio connectors have unique blocked pin placement that prevent these from accidentally being plugged into the wrong header. Note that there is no Type-C internal header: Type-E provides either Gen2 or Gen2+2 connectivity (depending on whether both lanes get their own bandwidth), but front-panel Type-C ports were previously connected to the original 19-pin connector prior to the Type-E connector’s release.

TLDR: The reason we usually say “USB3” or “USB 3.x” is that the number following the decimal place is continuously being updated with the new version incorporating previous standards. The newer connector to the left currently supports USB 3.2 Gen2 (10Gbps) and USB 3.2 Gen2x2 (20Gbps) transfers, while the wide connector next to it currently supports USB 3.2 Gen1 (5Gbps per port). We expect the “generation” label to remain consistent even after these are added to the next USB Implementers Forum (USB-IF) spec. Consistency is a rare commodity in the USB industry!

One thought on “Connecting Your Motherboard’s Front-Panel Header, Demystified”