
ASRock Z790 Taichi Carrara Review
ASRock’s Taichi motherboards have been bringing this site high-end features and a few small gimmicks nearly from its outset, but perhaps the gimmicks are forgivable when so many high-end buyers want to show off their purchases. Moreover, the Carrara series ditches the moving gear gimmick—which some buyers may consider gauche—in favor of a more-subtle marble-pattern sticker set.

| ASRock Z790 Taichi Carrara | |||
| Socket | LGA 1700 | Form Factor | ‘EATX’ (10.5″-deep) |
| Chipset | Intel Z790 PCH | Voltage Regulator | 27 (24+1+2) Phases |
| Rear I/O | |||
| Video Ports | HDMI 2.1, (2) Thunderbolt 4 Display | Audio Jacks | (2) Analog, (1) Digital Out |
| Rear USB 3.x | (2) 40Gb/s Type-C; (2) 10Gb/s Type A; (6) 5Gb/s Type A | Legacy Ports/Jacks | (2) USB 2.0 |
| Network Jacks | 2.5GbE, Gigabit Ethernet, (2) Wi-Fi Antenna | I/O Panel Extras | BIOS Flash |
| Internal Interface | |||
| PCIe x16 | (2) v5.0 (x16*/x0 or x8/x8*, shared w/M.2), (1) v4.0 (x4) | SATA Ports | (8) 6Gb/s (Ports 0-3 shared w/PCIe 4.0 x4) |
| PCIe x8 | ✗ | USB Headers | (1) v3.x Gen 2×2, (2) v3.x Gen1, (2) v2.0 |
| PCIe x4 | ✗ | Fan Headers | (8) 4-Pin |
| PCIe x1 | ✗ | Legacy Interfaces | System (Beep-code) Speaker, 3-pin PWR LED |
| CrossFire/SLI | 2x / ✗ | Other Interfaces | FP-Audio, (1) RGB LED, (3) ARGB LED, TPM |
| DIMM slots | (4) DDR5 | Diagnostics Panel | Numeric |
| M.2 slots | (1) PCIe 5.0 x4 (uses eight slot lanes), (4) PCIe 4.0 x4 | Internal Button/Switch | Power, Reset, CLR_CMOS / ✗ |
| Controllers | |||
| SATA Controllers | Integrated (0/1/5/10) | USB Controllers | JHL8540 Thunderbolt 4, ASM3042, ASM1074 |
| Ethernet Controllers | Killer E3100G PCIe, WGI219V PHY | HD Audio Codec | Realtek ALC4082 USB audio w/ESS SABRE 9218 DAC |
| Wi-Fi / Bluetooth | Killer AX1675x WiFi 6E (2.4 Gb/s) / BT 5.2 Combo | DDL/DTS Connect | ✗ |
Get it at Amazon

(click for availability)
The Z790 Taichi Carrara’s underside support shield is a little more functional than most since it’s thermally connected connected beneath the rear bank of voltage regulator components via a thermal pad. While it could also help keep the board from flexing in a flimsy case, we’re counting on anyone in the $500 motherboard market to pick a solid case first.

The other side is where all the action happens, and we find that ASRock has again turned functional a few things that were once considered gimmicks: The M.2 heat spreaders, for example, have become increasingly useful with every newer (and hotter) generation of NVMe SSD. The audio codec cover is the only show-only part, since it’s not even a proper EMI shield, but that circuit probably didn’t need an EMI shield.

The I/O panel is adorned with the same two USB4/ThunderBolt 4 ports as ASRock’s previous generation, but is now equipped with six 5Gb/s Type A ports in addition to the two special Gen2 (10Gb/s) Type A ports carried over from the Z690 version. ASRock doubles down on specialization by doubling the interface connectors on its two “Lightning Gaming” USB 3.2 Gen1 ports, but we question how much impact connecting these ports through both the chipset USB controller and a PCIe-based USB controller will have on keyboard and mouse latency. ASRock also keeps the legacy USB 2.0 ports that we consider to be “freebies” from a resource perspective but typically use for…a keyboard and mouse.

Before we move on, we should also mention that the dual Ethernet interfaces are Intel Gigabit and Killer 2.5GbE, that the wireless network controller is a Killer WiFi 6E (802.11ax), that the pair still supports Killer Doubleshot Pro, and that Intel purchase of Killer Networking has allowed it to make DoubleShot Pro compatible between its non-Killer (GigE) controller and Killer 2.5GbE controller. The only thing we find lacking, then, is its 2-channel analog audio output.
We’re not sure why, but ASRock has moved from Realtek’s high-end classic ALC1220 7.1-channel audio codec to onboard USB audio for the Z790 Taichi Carrara…and with that change has ditched most of the I/O panel analog jacks. Without two more jacks, you’ll need to reconfigure the rear mic input plus one of the front channels as multichannel analog outputs just to reach the USB audio controller’s 5.1-channel max specs. Without an outdated piece of software (DDL or DTS Connect) to encode live audio to a digital stream, and without an even more outdated analog connector set, virtualization via the included Nahimic Audio app is the closest that most Z790 Taichi Carrara owners will get to positional audio. We may be old-fashioned, but relying on virtualization through a pair of headphones to hear which direction our opponents are coming from rather than getting positional audio through a speaker set seems like a significant feature loss…even if only a few of us are old-fashioned enough to own a multichannel speaker set.

Looking straight down at its top, we can see that the Z790 Taichi Carrara’s upper edge (photo right, below) has two 8-pin EPS12V connectors for CPU power out back and two 4-pin PWM fan connectors up front, that the CPU socket area is fairly clean of connectors apart from a single PWM chassis fan header that’s located on the wrong (forward) side of the socket, that the area between expansion slots is filled with NVMe heat spreaders, and that the expansion slots are nicely spaced for multiple graphics cards. Builders whose second card is more than two spaces thick will learn quickly that the third slot gets blocked in, but the scarcity of SLI or Crossfire over the past few years means that builders are more likely to place something thinner mid-board. Oh, and we’ll forgive ASRock for putting the rear chassis fan’s header on the wrong side of the socket, since the oversized voltage regulator cooler would have left too little room behind the CPU socket to connect a fan there.

The front edge is also lined with connectors, starting with two ARGB in the upper corner (lower right in photo), followed by a 24-pin ATX power connector, a PCIe-based supplemental power connector for high-draw slot devices, Gen 2 and a Gen 1 USB 3.2 headers, eight (four pairs) forward-facing SATA connectors, and two front-panel group headers that we’ll discuss in a moment.
The most important takeaway from the front edge connector group is that half of its SATA will be disabled whenever as card is installed into the third expansion slot. Few users need all eight SATA ports, but some will certainly be confused about which ports to use after deploying that slot, and that’s just the beginning of potential resource exclusion confusion: The top NVMe drive space has two NVMe slots, one with a PCIe 4.0 and the other with a PCIe 5.0 interface, and only one of these can be used at a time. Furthermore, while the PCIe 4.0 NVMe interface has its own resources, the PCIe 5.0 NVMe interface dips into the CPU’s sixteen total PCIe 5.0 lanes. Oh, and the CPU’s PCIe 5.0 controller can only address two devices, so users must decide whether they’d like to have their graphics card get all sixteen lanes, or whether they’d like to split those sixteen lanes across the first two x16-style slots in x8/x8 mode, or whether they’d prefer to have an PCIe 5.0 interface serve their top NVMe drive. Because the CPU’s PCIe 5.0 controller can only address two devices, the second PCIe slot and the fastest NVMe slot can’t be used at the same time, even though the NVMe slot only uses four lanes.

To deal with the higher peak power draw of 13th-gen Core processors, ASRock expanded its CPU voltage regulator to 24 core phases at 105A each. Using the RAA229131 controller, the 24+1+2 design features a matching RAA22010540 MOSFET on the non-core single phase and a SM4336/SM4337 (65A) set on each of its other two non-core phases.

Lining the Z790 Carrara’s bottom edge are an HD-Audio front-panel header, a pair of CLR_CMOS jumper pins, a classic RGB LED header, one (of three total) ARGB header, two (of eight) 4-pin fan, a second USB 3.2 Gen1 header, two classic USB 2.0 headers, a two-digit status code display, two more PWM fan header, a button set that includes CLR_CMOS, Reset and Power, an add-in TPM header, yet another PWM fan header, an Intel-style front-panel button/LED group and, above it, a legacy 3-pin-spaced power LED and 4-pin-spaced beep code speaker set (click to enlarge)


Included in the Z790 Taichi Carrara retail box are the motherboard, two reusable cable ties, an aluminum case badge, four SATA cable, a printed user manual, a color-matched ASRock Carrara 120mm fan, a two-channel Wi-Fi antenna, and a legacy USB 2.0 breakout cable on a smoked chrome colored slot bracket. ASRock says that the fan and antenna are optional, so it’s possible that the packaged contents of other markets may differ.

Also included but not shown are four fan screws and four M.2 drive screws.
Z790 Taichi Carrara Software
Z790 Tiachi Carrara firmware includes an auto downloader that’s configured to run the first time the system goes online in Windows, and then switch off. Rather than treat it as an annoyance, we viewed it as an opportunity to see what we’d missed. The thing we’d missed was Killer Networking software, and when its installation completed it directed us to Windows Store for the control application. Unfortunately the application ran with a “service not enabled” error, and after trying to reinstall, remove, and update the driver/service package, the application eventually refused to even reinstall.


Unlike the Intel Killer software, Nahimic’s suite ran fine. Also completely unlike the other software, Nahimic’s suite required a bit of a search to install. It did everything but one thing as expected: Our 3D virtualization experience wasn’t all that 3D and sounded very…stereo coming from a set of Steel Series headphones (already several years old, we’re glad we kept those to eliminate any excuses). Having said that, our experience with Nahimic’s virtualization was far more intriguing during CES 2015, and it’s possible that this editor’s hearing isn’t as acute as it was eight years ago.


Another app that required a search of the motherboard’s download page to locate, Polychrome Sync did an excellent job of addressing our motherboard’s ARGB onboard lighting and headers. Unfortunately, it was not capable of completing the hand-off from our Viper Venom DDR5 memory.


The application that’s supposed to give us all of the other applications that go with the Z790 Taichi Carrara, ASRock’s Live Update & App Shop offered us both the Killer driver suite and the Nahimic audio utility from its Live Update page, plus App Charger (USB quick charge mode control), A-Tuning (listed as Motherboard Utility), and an ASRock-themed version of cFosSpeed called XFast LAN. If you thought that it might have also included some reference to Polychrome Sync, that would be another memory of the way things were. AppShop is no longer automatically referenced by anything and must be searched for on the motherboard’s download page, which is a little sad since most of the things it offers are also found on that same web page.


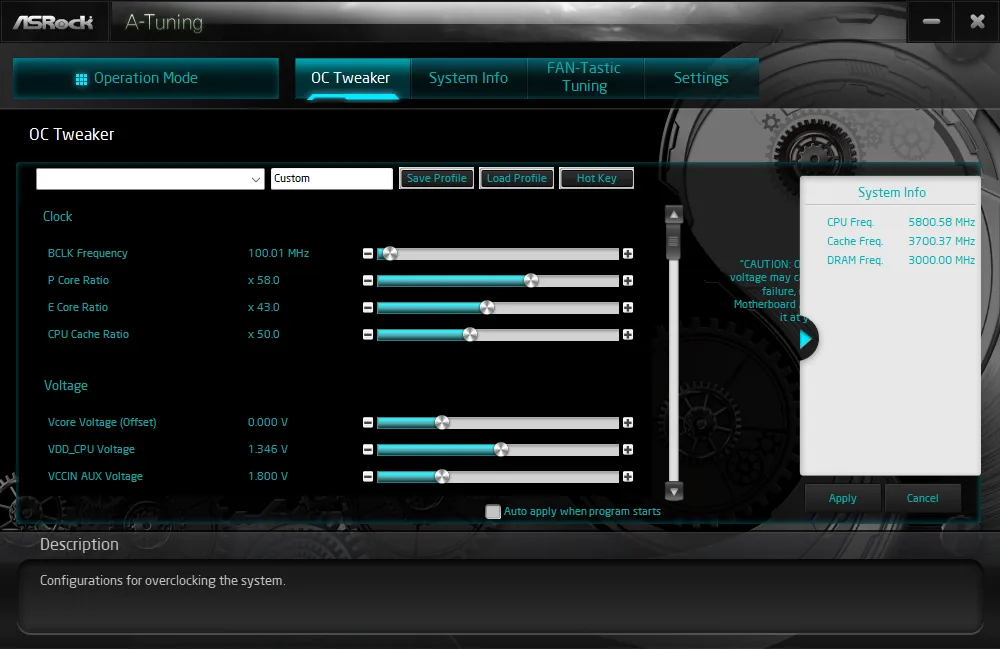
ASRock A-Tuning offers both manufacturer-configured performance modes and user-defined overclocks, in addition to a very useful system info page and both manual and automatic fan controls. We found ourselves in full control of our CPU voltage and clocks until we did something wrong and made our system crash, as that’s how overclocking works.


As for ASRock programmed modes, our system pulled well past 500W of power consumption for the first few seconds of using “Performance” mode under Prime95 small FFTs, after which it dropped from 5GHz to 4.9 GHz at around 440W power use, and finally dropped to 256W at 3.9GHz after around a minute, where it stayed until we killed the load and watched the system idle down to 91W.
“Standard” mode crippled our clocks at 2.4 to 2.8 GHz while still using enough voltage to pull a 424W system load (around 300W of CPU power) for the first few minutes, after which it dropped our core voltage from 1.3V to 1.04V without lowering clocks any further. 254W loaded and 87W unloaded were the final results after those first few moments of excitement.
For those who want all the thrill of watching their power meter spin like a fan blade for a minute or two but don’t want a fast PC, “Power Saving” mode did the same thing as “Standard” mode but dropped the CPU clock to 2.20GHz.
Z790 Taichi Carrara Firmware
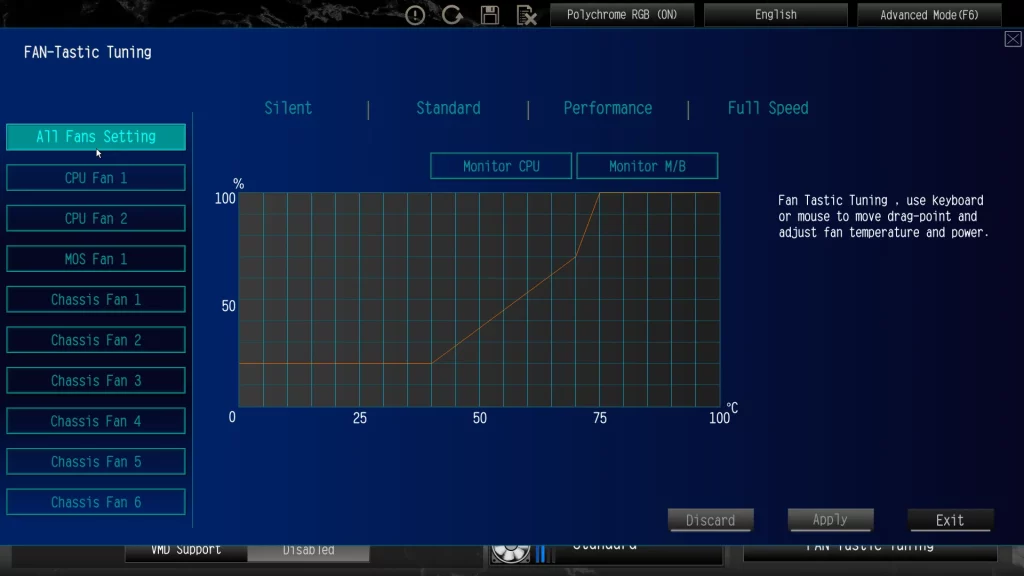
The Z790 Taichi Carrara defaults to its Easy Mode firmware GUI, which gives users and builders a chance to make needed changes without concern for damaging parts. Options include enabling a memory kits XMP profile, altering a fan profile, changing boot order, entering firmware flash mode, and running a fan tuning algorithm. A standard keyboard’s “F6” key switches it into “Advanced” mode, if needed.


Of course we needed (advanced mode) since we’re overclocking: Unlike Intel’s flexible ratios that start out high and decrease precipitously when more cores are loaded or heat issues crop up, manual overclocking allows us to find the highest continuous frequency possible under a given load. Overclockers will even find a handy number of registers (ten) in which they can store their custom overclock configurations when attempting a variety of methods, and the firmware will even allow those so-called ‘user profiles’ to be imported and exported using a usb flash drive.


We maxed out all the power and thermal limits within the CPU Configuration menu before trying our hand at maximum clocks for two loads, Cinebench and Prime95. We’ll discuss those results further in our results below.


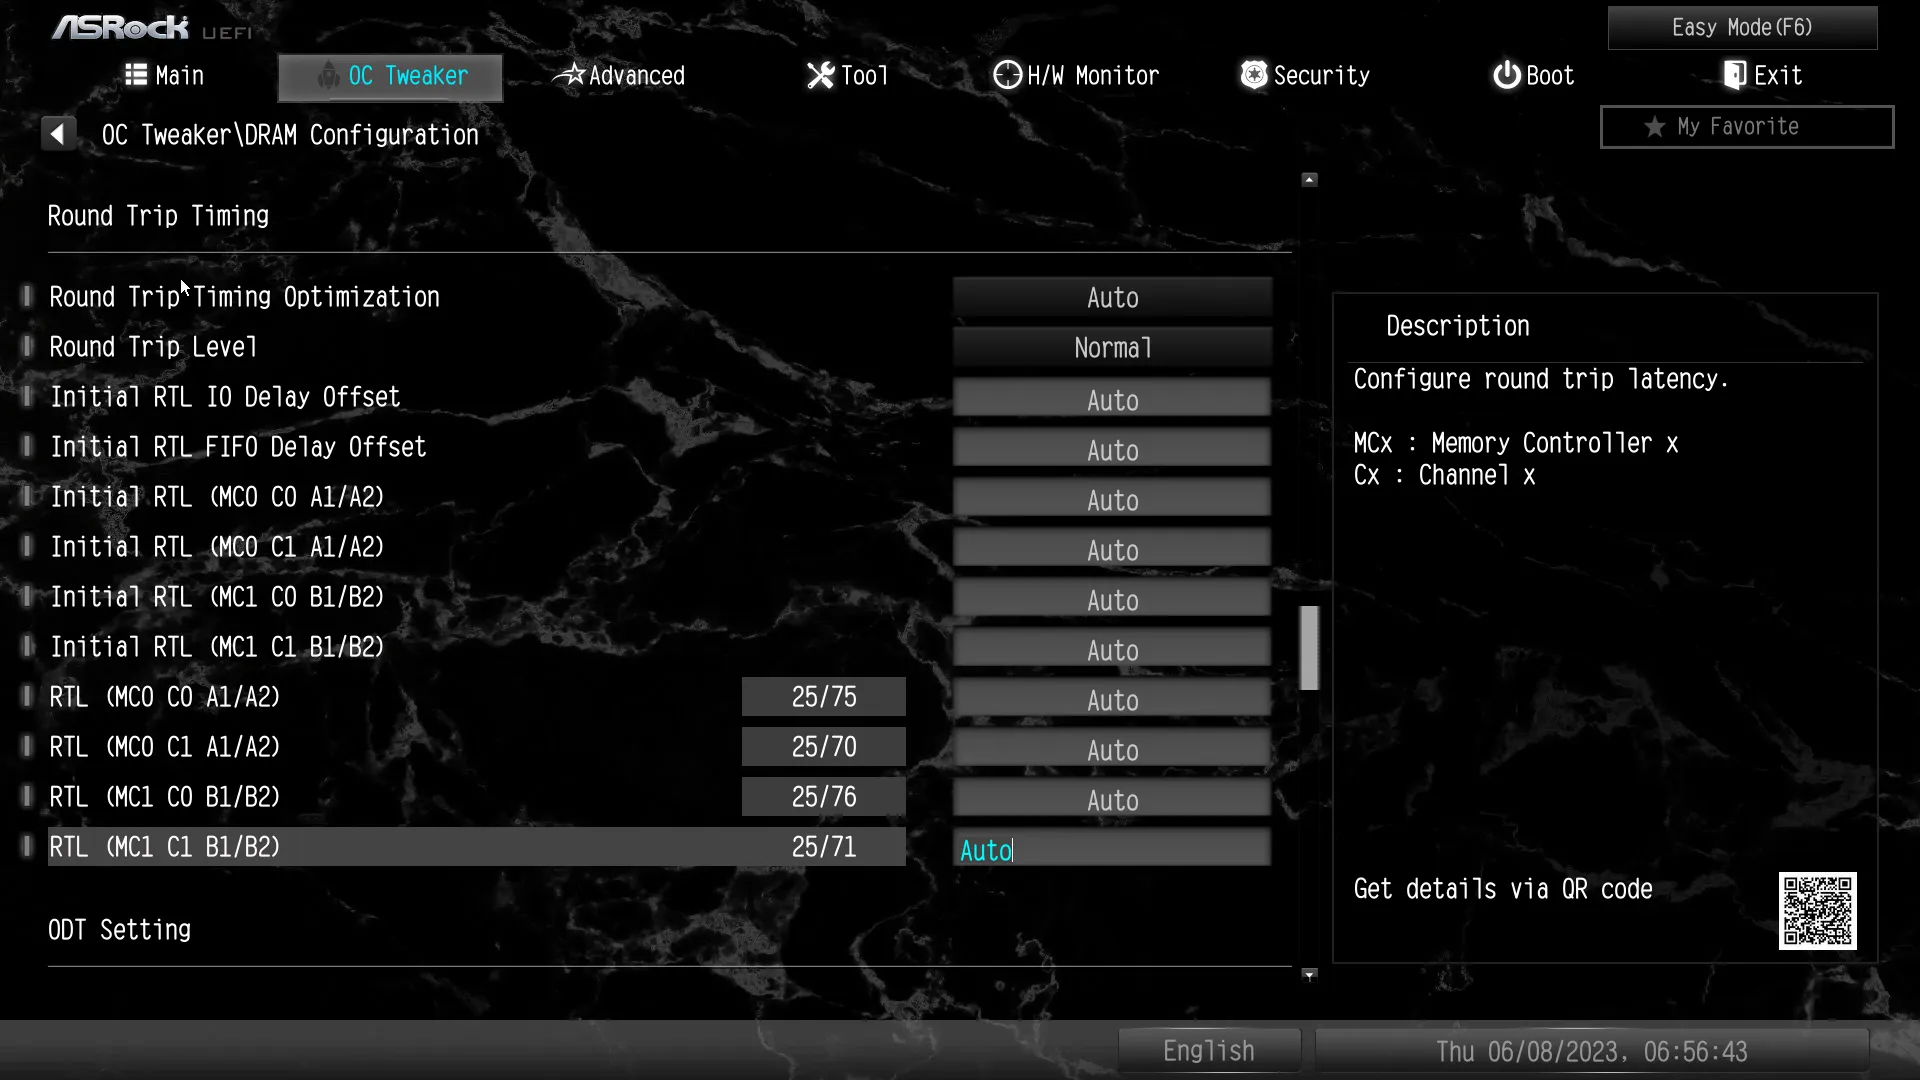
Firmware is ASRock’s forte, with memory tweaking made both easy and complex depending on how many settings you’re comfortable with changing from automatic configuration. For our overclock, we simply increased our latency to CAS 42.


While increases in clock speed alone can raise core temperatures slightly under load, an overclocker won’t get too far doing that before the system crashes. Voltage increases allow the CPU to clock far higher before crashing, but higher voltage is also a larger contributor to high temperatures. Eventually an overclocker will find their system unable to expel heat as quickly as it builds, and that’s where the fun stops. On the Z790 Taichi, this occurred at the board’s 1.42V setting when running Cinebench R.23 multicore, but the heavier load of Prime95 caused our Core i9-13900K to reach those same temperatures at a mere 1.22V setting, Another setting, “Load-Line Calibration” helps compensate for voltage dropping under load: Setting it to Level 1 caused our CPU core voltage to climb from 1.42V to 1.456V when running our Cinebench-configured overclock, and from 1.22V to 1.232V when running our Prime95-configured overclock. Lesser compensation settings dropped and fluctuated far too greatly to prove useful in these overclocked tests.


The Advanced-mode GUI’s “Advanced” tab is where users can set the default UEFI GUI (to either the original Easy-mode default or this one), but that only sticks until an overclocker gets stuck and is forced to erase their custom settings via the CLR_CMOS jumper, button, or battery removal. Oh, and onboard controller settings are also found here.


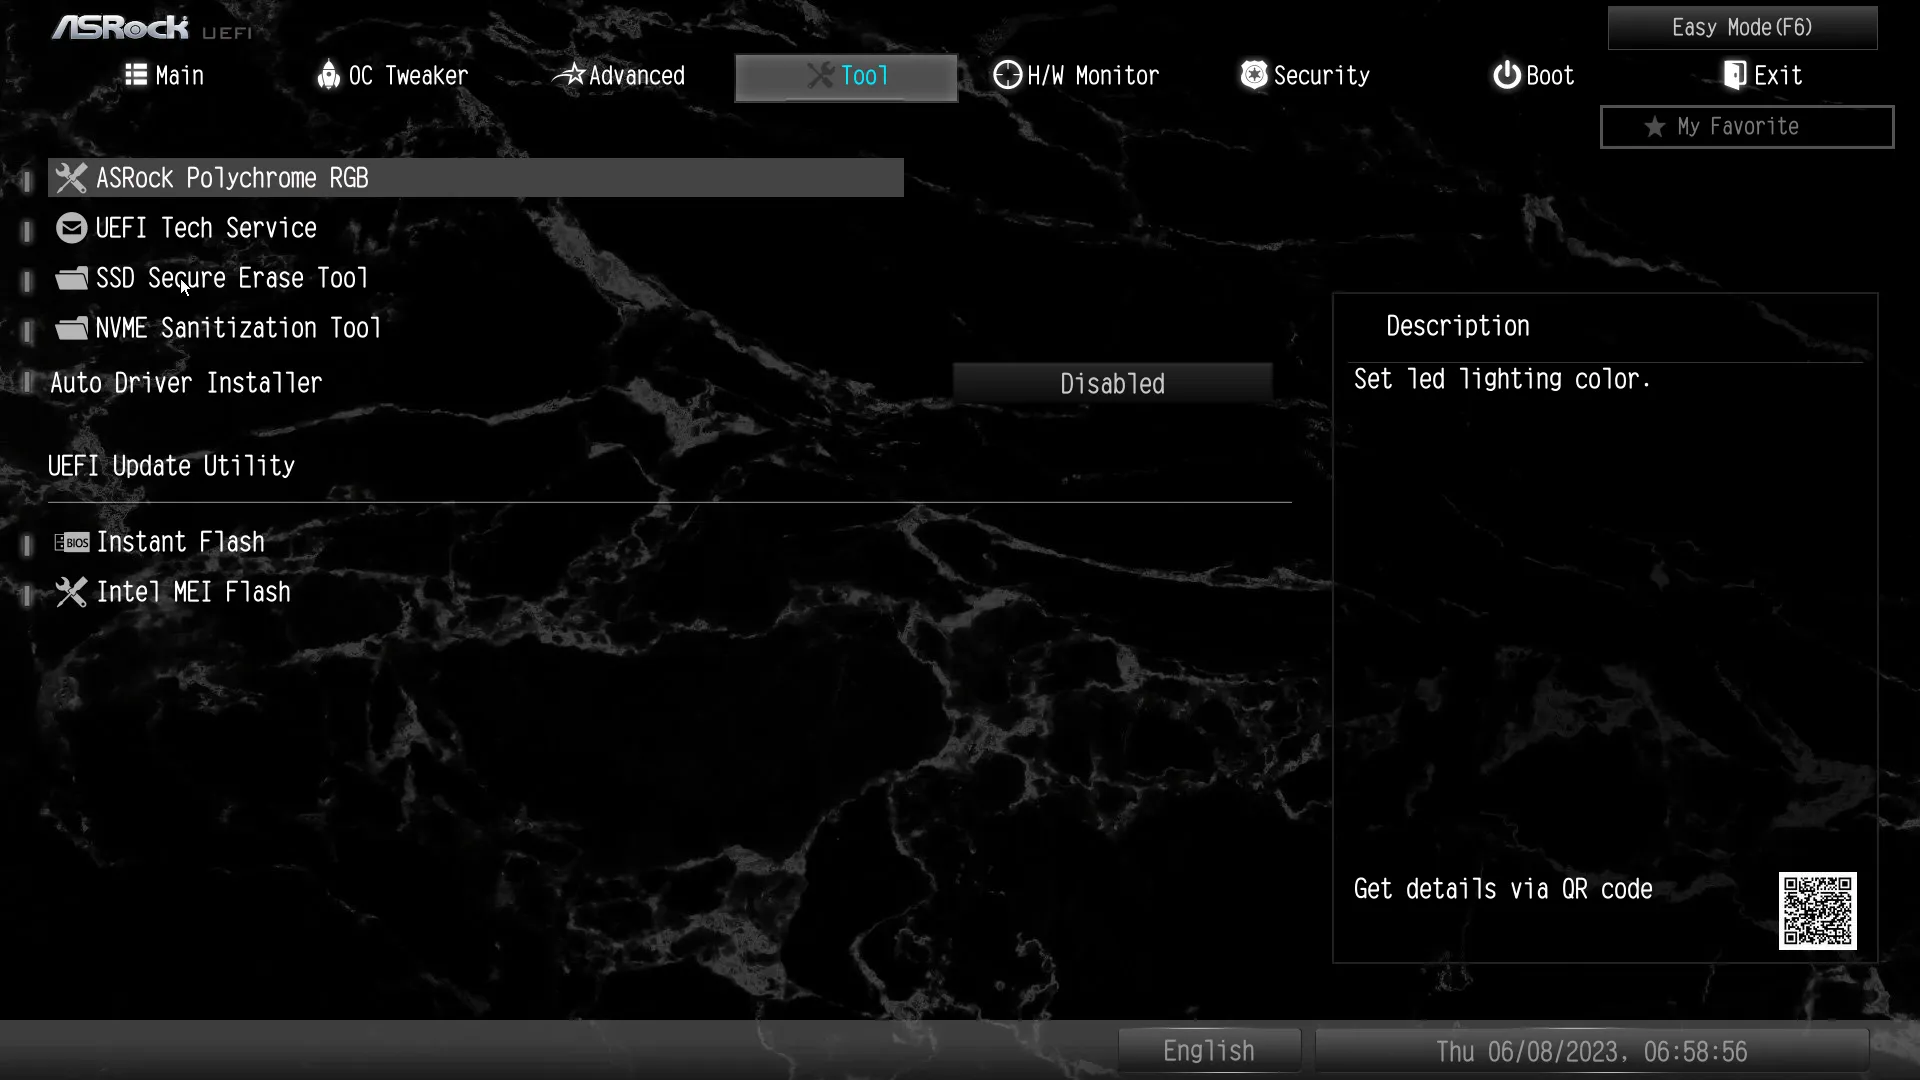
The “Tool” menu is where you’ll find the firmware version of Polychrome RGB, which only controls onboard devices and headers. It also has an SMTP for sending emails to tech support, drive cleaning tools, an “Auto Driver Installer” that by default only runs once to install drivers in windows, and two shortcuts to a special firmware updating GUI.

The H/W Monitor menu shows a few key voltage and temperature readings, but most of its length is consumed by fan settings. Choosing “Customize” allows users to define a fan map numerically, though scrolling up to the Fan-Tastic Tuning button gets users back to the same graph method that we saw in Easy Mode. One setting above that, the Fan Tuning button starts ASRock’s fan-tuning algorithm, which checks the installed fan to find its maximum and minimum RPM and reconfigures the board’s automatic settings around that range.


| Test Hardware | |
| CPU | Intel Core i9-13900K: 24C/32T, 3.0-5.8 GHz, 36 MB L3 Cache, LGA 1700 |
| CPU Cooler | Alphacool Eisblock XPX CPU, Eisbecher D5 150mm, NexXxoS UT60 X-Flow 240mm |
| DRAM | Patriot Viper Venom RGB DDR5-6200 2x16GB (32GB) CL40-40-40-76 1.35V |
| Graphics Card | Powercolor Red Devil Radeon 6750 XT: 2324-2623MHz GPU, 12GB GDDR6 |
| Power | be quiet! Dark Power Pro 10 850W: ATX12V v2.3, EPS12V, 80 PLUS Platinum |
| Hard Drive | Sabrent Rocket 4 Plus 2TB PCIe 4.0 M.2 SSD |
| Sound | Integrated HD Audio |
| Network | Integrated Wi-Fi |
| Graphics Driver | AMD Adrenalin Edition 2022.10.1 |
Overclocking Results
Prime95’s small FFTs pattern is known as one of the most stressful loads a user can place upon a CPU, and it was formerly the test that brought professional overclockers (primarily those who attend trade shows to do it for money) to their knees. So a few of them decided to lighten the load using Cinebench, stumbled into a higher frequency as if by magic, and it wasn’t long before other overclockers followed suit if only to keep people from making fun of their lower—but more honest—frequency numbers. We used both tests.

You’ll notice that we’re nowhere near our CPU’s stock maximum frequency, and that’s because our CPU thermal throttles after only a few seconds at the higher voltage needed to reach that frequency. Both our 5600MHz Cinebench and 5200MHz Prime95 numbers represent the thermal limit of our CPU under continuous load, where the additional voltage needed to keep those cores stable at a higher clock would actually cause the clock to fall due to thermal throttling.

You may have noticed the we also reached DDR5-6800: We ran our test suite to make sure our apps wouldn’t crash at that data rate, using nothing more than the XMP-placed 1.35V voltage and a small increase to CAS 42 timings. Retesting proved that the overclock did improve performance, though the Z790 Taichi Carrara’s improvement was smaller than that of its predecessors. Smaller improvements often mean that the firmware is increasing some of the timings that we didn’t mess around with in an attempt to improve stability…at some cost in performance.
Benchmark Results
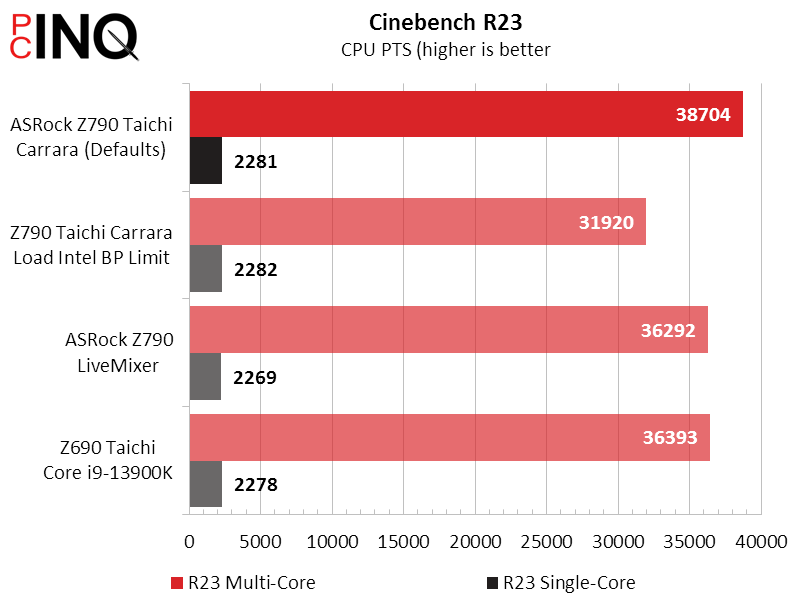
We noticed early into our benchmarks that the Z790 Taichi Carrara’s new 7.04 firmware revision was bumping multi-core loads into territories formerly reserved for loads across two or fewer cores, but couldn’t decide how to make these new numbers jive with those of previously tested products. We assumed that the new firmware was instructing the CPU to ignore its power limits, and rather than spend a couple days per board retesting our older samples with similarly updated firmware and hoping that those updates would have the same effect, we went into BIOS and enabled the “Load Intel Base Power Limit” for a second test.


CPU power limits shouldn’t, and didn’t, have an impact on memory scores (above). Moreover, enabling Intel’s Base Power limit barely had any effect on 3DMark (below). Since we’re using the same hardware and drive image, the Z790 Taichi Carrara’s performance increase has us scratching heads.


The Z790 Taichi Carrara gives PCMark 10 Essentials a big boost in App Startup and Content Creation scores which, being based on real-world application usage, will both be reflected in our final tally.


There’s also something weird going on in our F1 2021 bench, with the Z70 Tachi Carrara’s lower-performance configuration and Z790 LIveMixer’s default configuration beating the other two at medium detail. Chance perchance?

7-Zip is the first benchmark to really take a hit from enabling Intel’s 13900K CPU power limits, but amazingly the Z790 Taichi Carrara’s default-setting performance matches that of the other two motherboards. Meanwhile, Cinebench jumps ahead with the Z790 Taichi Carrara left to its default high-consumption settings, and flails when that same board is manually reverted to supporting Intel’s baseline CPU power settings. While result consistency across the single-core benchmark of all four configurations points to the newly updated Z790 Taichi Carrara simply cheating by a greater amount than its two rivel models at motherboard defaults, you can see why it’s so hard to pin down some of these differences.

Lower is better in timed workloads, and the thing we said about “cheating more” appears to apply to the Z790 Tiachi Carrara’s “Handbrake” score. Yet for users, a default cheat that’s transparent simply becomes another performance advancement.

Power, Heat & Efficiency
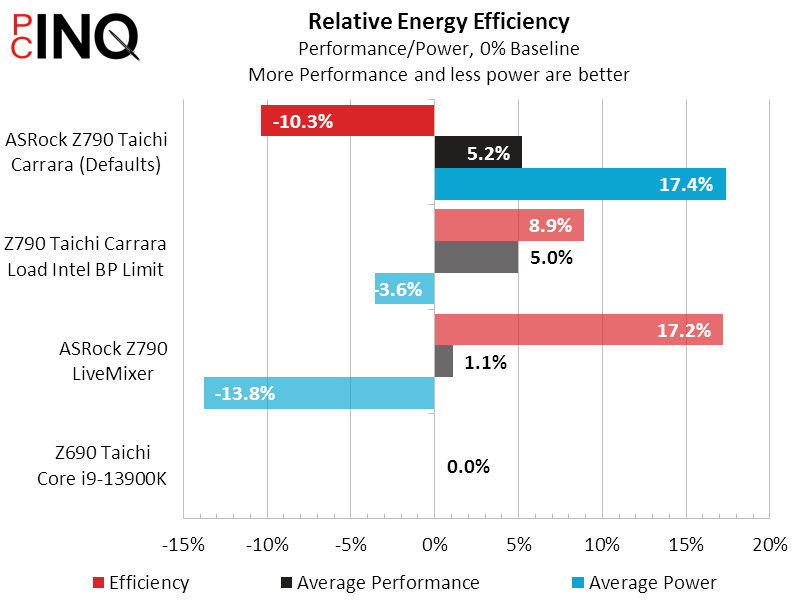
The next question that these test differences raise is whether the newly-updated Z790 Tiachi Carrara’s performance advancement is truly transparent. The answer is a solid “no” when it comes to power use, as our machine’s power consumption leapt to around 640W briefly before settling in temporarily at 539W, a full 100W higher than with Intel’s base power limits enabled and even 90W more than we saw in the similarly-equipped Z690 Taichi at its default.

Differences we saw in power consumption have a big impact on CPU temperature. We’re glad that ASRock was at least able to keep its voltage regulator nice and cool.

Improvements in PCMark’s Creative Suite benchmark had the greatest contribution to the Z790 Taichi Carrara’s leadership, and it’s because other apps were less influential that the high-wattage configuration beat the normal-wattage configuration by a mere 0.3%

That of course means that the Z790 Tachi Carrara fell deeply into negative territory when comparing its default high-power configuration to any of the others. The true efficiency winner, ASRock’s Z790 LiveMixer barely underperformed the new board while drawing significantly less energy than either Taichi product in any configuration.
Conclusion: Great performance, for a price
The Z790 Taichi Carrara is the fastest LGA 1700 motherboard we’ve ever tested, but it doesn’t get there by magic: It uses higher default clocks, and that pushes its power consumption through the roof. It’s also the best overclocking board that we’ve ever placed our Core i9-13900K CPU upon. And it’s not like the board is wanting for any major features, owing to its inclusion of twin USB4 / Thunderbolt 4 ports on the back panel and a PCIe 5.0 NVMe slot inside. Audio connectivity is the feaure it comes up truly short of previous-generation boards: Even though it still supports 5.1 channel surround in theory, getting that config via a mixtures of front and rear ports seams like a task that most owners would be unwilling to undertake. While headphone use is almost ubiquitous among current gamers, taking the 7.1 option completely off the table seems like an overreach.
The loss of audio connectivity initially seems an unforced error: We know that the chipset supports those old 7.1-channel codecs because the Z790 LiveMixer uses an even older (and cheaper) version of the one found on previous Taichi models. It’s almost as if someone told ASRock that the ALC1220 was old hat and ASRock listened without considering that the newer part would give up features without actually improving anything. The again, the paucity of audio connectors on both models points to ASRock attempting to satisfy a buyer who believes that the only way to move forward is to eliminate old features even when no suitable replacement exists. To them we say…ears are an old feature, too.
Yet so few buyers will be negatively impacted by the missing audio outputs that it might not noticeably impact motherboard sales. We instead have other missing features to consider: The PCIe 5.0 NVMe slot for example can’t be used at the same time as the second PCIe x16-length slot. Of course, most users won’t need that slot, but there’s another thing to consider: Using the PCIe 5.0 NVMe slot means sacrificing eight of the sixteen PCIe 5.0 lanes that are supposed to go to the graphics card. In light of all the flack nVidia has gotten over its RTX 4060 having only eight lanes, ah who are we kidding it’s still PCIe 5.0.
| ASRock Z790 Taichi Carrara | |
| Pros | Cons |
| Gigantic 24+1+2 phase voltage regulator Performance boosted over previous gen Includes PCIe 5.0 NVMe slot | PCIe 5.0 NVMe slot uses GPU lanes Terrible full-load efficiency at UEFI defaults Only two I/O-panel audio jacks |
| The Verdict | |
| A big voltage regulator gives the Z790 Taichi Carrara added stability, while additional interfaces that can’t be used simultaneously give it some configuration flexibility. A fine board for those who use stereo speakers and/or headphones exclusively, ASRock’s ongoing abandonment of 7.1-channel speaker system users comes at little to no cost savings, and potential marketing reasons for its decision have us shaking our heads. | |
What’s really going on with the Z790 Taichi Carrara is that it, like so many other high-end boards based on mainstream platforms, has a bunch of great features that can’t be used simultaneously. While that’s an Intel issue rather than an ASRock one, we don’t like asking people to pay for more features than they can actually use.
The best part, then, is that the Z790 Taichi carries the same price tag as the Z690 board it replaces. We get four additional voltage regulator phases, two additional SATA connectors that get disabled whenever we use the bottom slot, and one updated PCIe 5.0 NVMe interface that gets disabled whenever we fill the center slot. Not a bad deal, then.