
Corsair 2500X Micro ATX Gaming Tower Review
Given the full-sized space it provides for memory slots and CPU voltage regulators, any time is a good time for a Micro ATX revival. The previous rise of the middling size came with convergence of portable gaming PCs and SLI/CrossFire: This time we’ll credit triple-slot graphics card coolers for forcing game system builders to look beyond the far more drastic limitations of Mini ITX. Yet even after knocking off three of the ATX form factor’s slots, the word “small” hardly applies to a Micro ATX case that has room for three radiators and cards over 400mm long.
| Corsair 2500X (2500X-BLK-PK) | |||
| Type | Mini Tower | Included Fans | X |
| Motherboard Support | Micro ATX, Mini ITX | Front Fan Mounts | X |
| Dimensions (HxWxD) | 14.75″ x 12.00″ x 18.88″ (37.5 x 30.5 x 47.9 cm) | Rear Fan Mounts | (1) 120mm |
| Weight | 24.5 lbs (11.11 kg) | Top Fan Mounts | (3) 140mm / 120mm |
| Max Motherboard Depth | 18.125″ (46.0 cm) | Bottom Fan Mounts | (3) 140mm / 120mm |
| Card Length | 460mm | Side Fan Mounts | (2) 120mm |
| Power Supply Format | PS/2: Max Depth 285mm | Top Rad. Clearance | 57mm vertical, 36mm horiz. (max) |
| Air Cooler Clearance | 180mm | Front Rad. Clearance | X |
| External Bays | X | Front Filter | X |
| Internal Bays | (2) 2.5″, (2) 3.5/2.5″ | Top Filter | None |
| Card Slots | 4 | Bottom Filter | Nylon mesh (slide-out) |
| Ports/Jacks | (1) Gen2 Type-C, (2) Gen1 Type A, Head/Mic Combo | Damping | None |
| Other | X | MSRP | $200 |
Find it at Amazon

(click for availability)
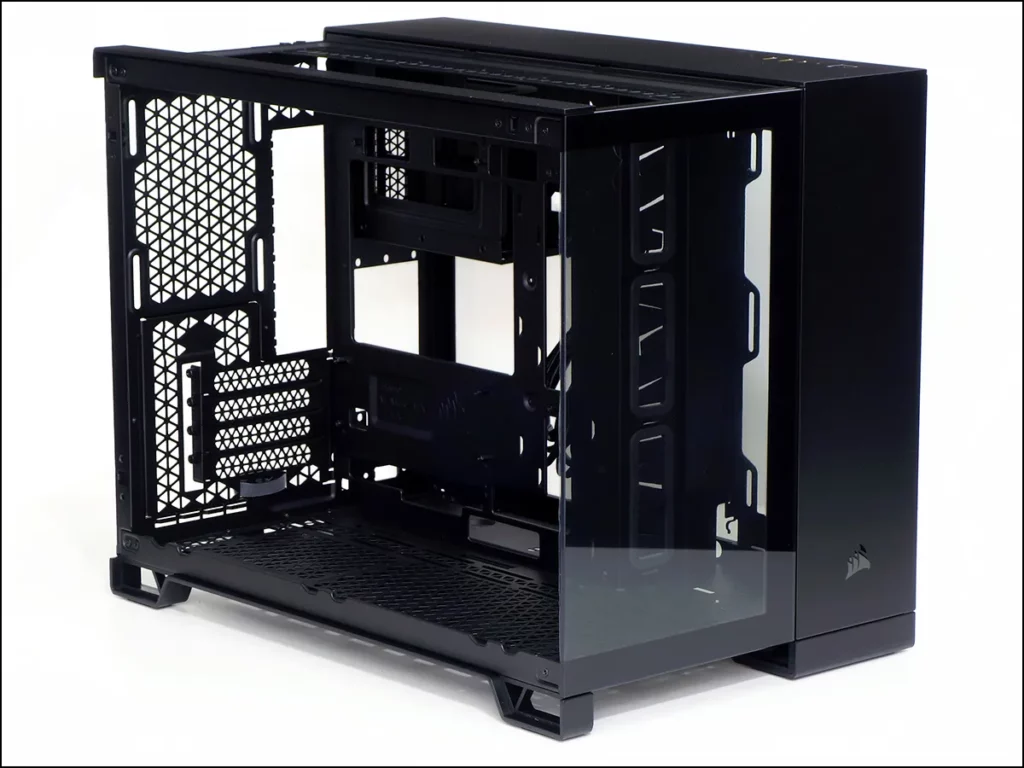
Added radiator space both above and below the motherboard makes Corsair’s Micro ATX model 2500X as tall as some full-ATX mini-towers, just as making those mounts over 400mm deep gives the 2500X a truly full-sized depth. All the extra space in front of the motherboard gave Corsair room to add an additional dual-120mm fan mount at the front of the right side panel, and placing the power supply behind the motherboard created a 4″-deep power supply chamber that gives equal depth to the 240mm-format side fan/radiator mount.

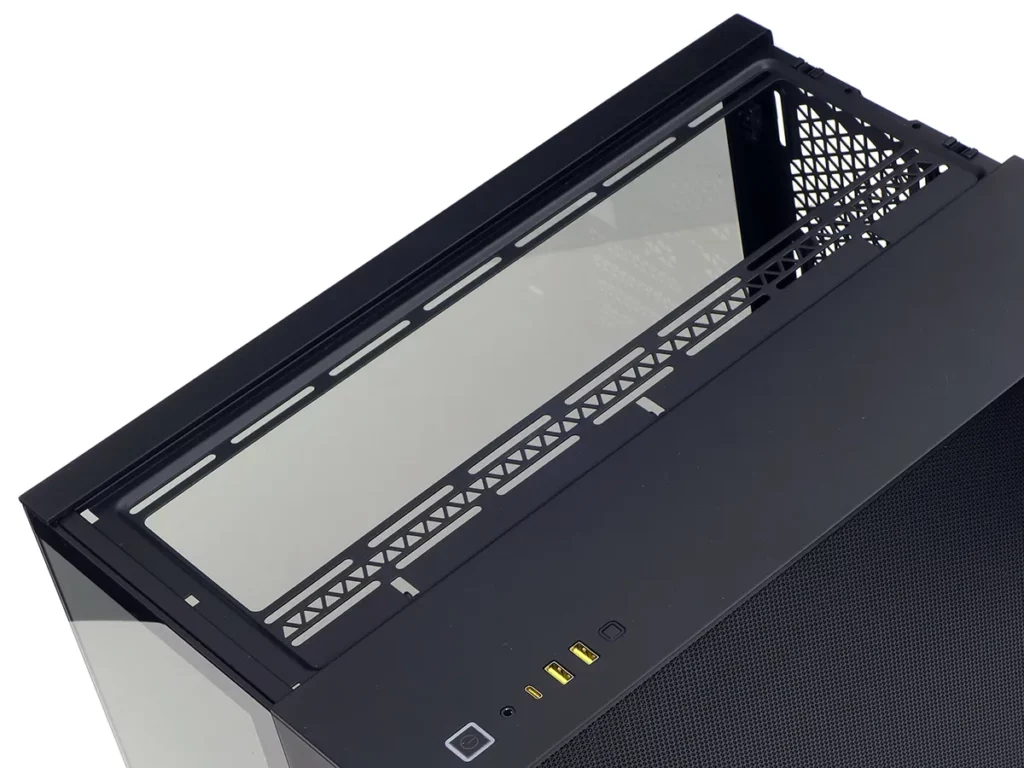
The top-panel location of front-panel ports confuses us slightly, in that we can’t imagine anyone putting a case that stands less than 15” tall on the floor next to their desk. Perhaps your desk is short enough to reach these ports anyway? The two USB3 Type A ports and one USB3 Type-C port are bounded by a four-pole headset plug and lighted power button at the front and a reset button at the rear.

Lifting off the top cover exposes an open-centered radiator mount with screw slots for mounting up to three 120mm or 140mm fans in various positions. With 432mm of space front to back, the mount provides 36mm of horizontal clearance between a 240mm or 360mm cooler and a 6-layer motherboard in addition to its 57mm of vertical distance above that motherboard’s top edge.
The bottom panel’s full-length dust filter also slides out the front for easier cleaning. This is the only truly washable filter, as the ventilated right-side panel is backed by a captured mesh sheet, and the top panel has no filtration at all. While that still leaves compressed air as a viable option for cleaning the right side panel’s vents (from the back side), it dedicates the top panel to function as exhaust. Which, of course, is fine with us.

The back panel includes a removable slot panel for which a vertical graphics card replacement is available, with stand and cable, for $75. Above it is a 120mm rear fan mount with around 30mm of vertical positional adjustment, and the power supply bay is located in the case’s second chamber, behind the motherboard tray.

Though it’s over 285mm deep, Corsair fitted the PS/2 (full ATX) power supply bay with an SFX adapter plate…just in case you wanted to use the smaller power supply to get shorter cables. A dual-bay drive cage above it features two trays with mounting holes at both 3.5” and 2.5” spacing.

And now for the part that better sites won’t tell you: Our 2500X arrived with its drive cage was banging around, attached only by its hanger screws at the top. After removing the screws to insert its tabs properly, we found that a folded edge on the SFX adapter plate kept us from dropping the cage to a low-enough angle to insert those tabs in their slots. Removing the SFX adapter plate gave us the space to insert the cage’s tabs, after which we were able to reinstall the SFX adapter plate for photos.
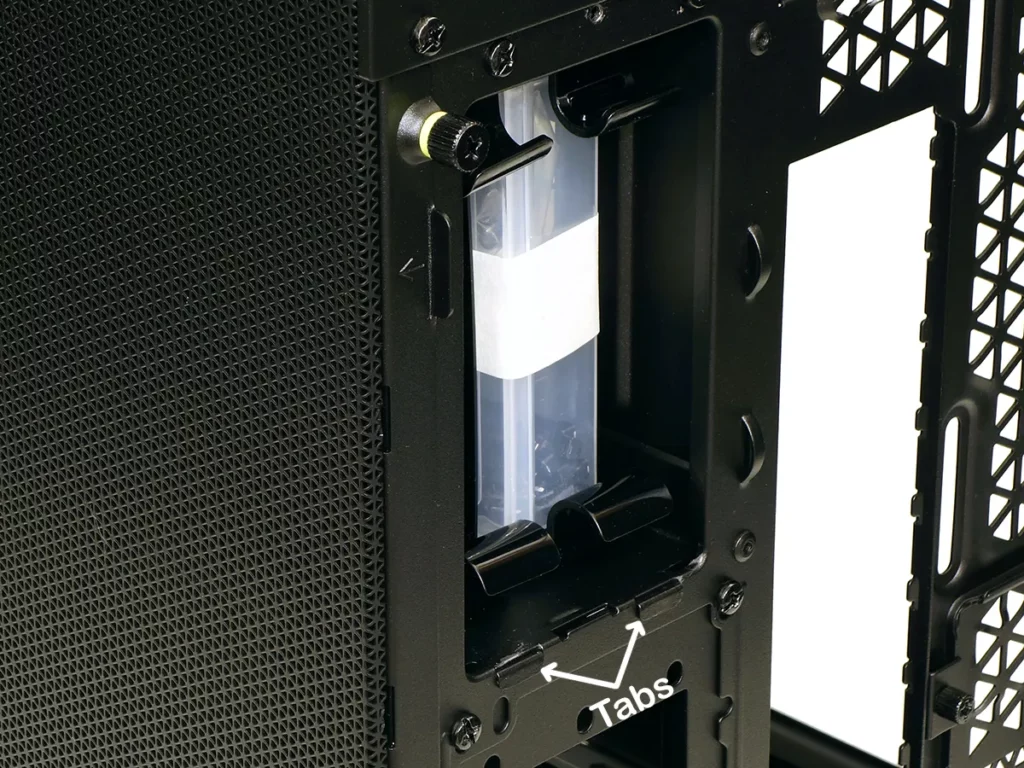
Our struggle to properly assemble the parts that weren’t assembled on the assembly line didn’t end with the drive cage, as its tabs now stuck around 0.8mm out of the back of the case. The back cover also used a tab at the bottom to engage a slot in the back panel (see between the tabs, above), but the cover’s tab was only offset from its corner stops by roughly the thickness of the back panel. Because the bottom corners of the back cover now had to fit over the cage’s tabs as well, its tab needed to be offset twice as far. And that’s probably why the person who assembled this case…assembled it wrong.
Fortunately, we were able to “adjust” the offset of our cage cover’s lower center tab using nothing more than a Wonder Bar style flat pry bar (monetized link).

A large hole towards the rear of the motherboard tray allows builders to install a CPU cooler’s support plate behind its socket, but gaining full access to that area requires the drive cage to be temporarily removed. Additional rectangular holes around the motherboard’s periphery are designed to support the rear-facing cable connector projects being forwarded by companies like Asus and MSI. Meanwhile, the cable passages that we’re supposed to use face forward, out of the power supply chamber and into the side-mount radiator space.
We should note that Corsair only rates the 2500X top and bottom panels for up to two 140mm fans, which prompted us to get place three of our own 140mm fans there just to prove that three do indeed fit. Perhaps the firm is trying to crush any hopes that users might have of putting a 420mm radiator in either location, as end caps of 420mm-format radiators extend their overall length to around 460mm. Even though the bottom panel has slightly more clearance at the front and rear edges than the top panel, we still measured only 445mm between its front panel bracket and rear edge rivets.
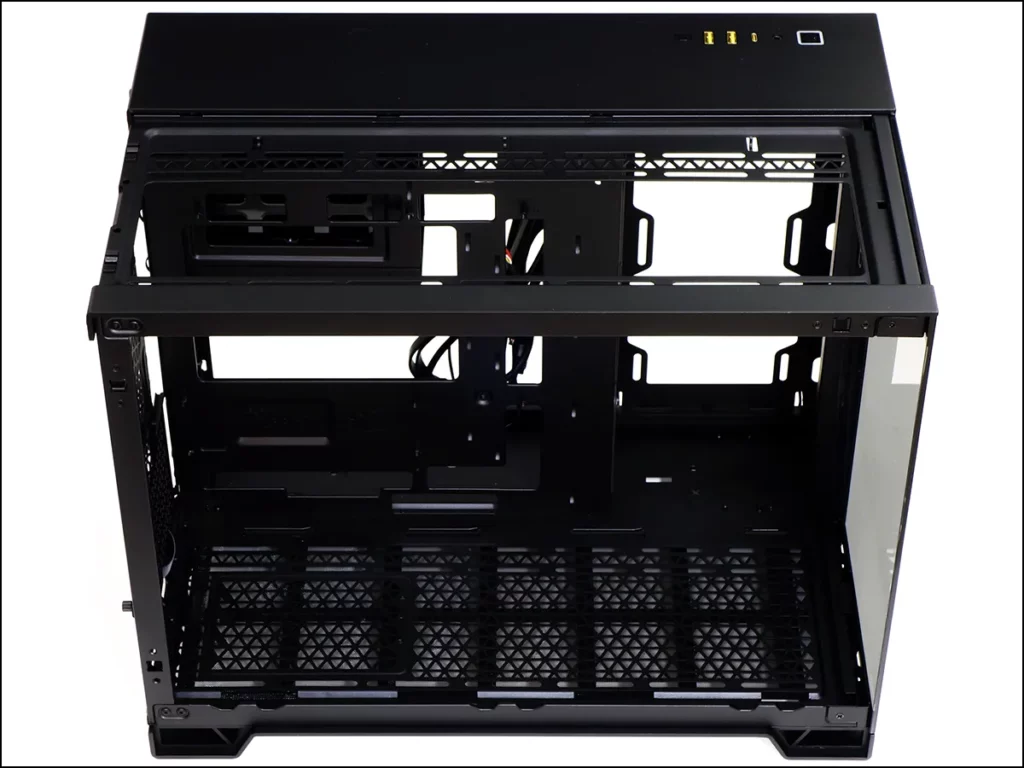
Since the distance between front and rear panels is 460mm, a builder who is highly motivated to mount a 420mm-format radiator might use spacers to get their radiator below the obstructions along the top edges, or above those of the bottom edges. See how we accomplished a similar feat here.
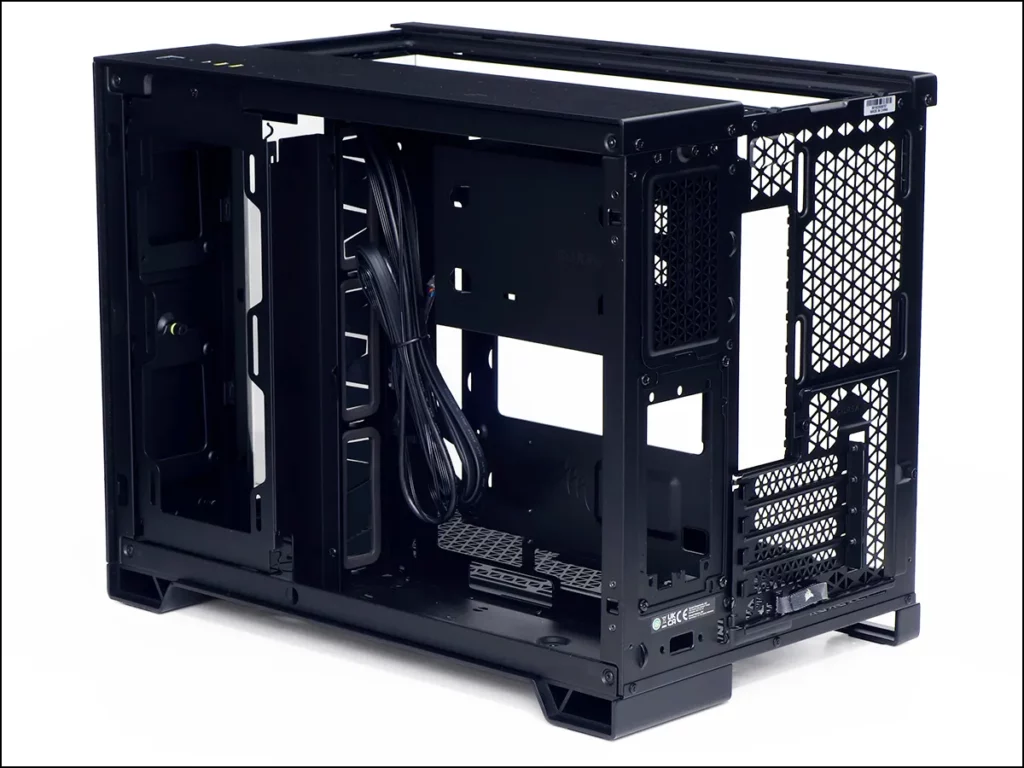
Keen observers will notice that Corsair hid its two 2.5” drive trays on the back side of the front panel, in front of the 292mm tall by 100mm deep (240mm-format) side radiator mount.
Building With The 2500X
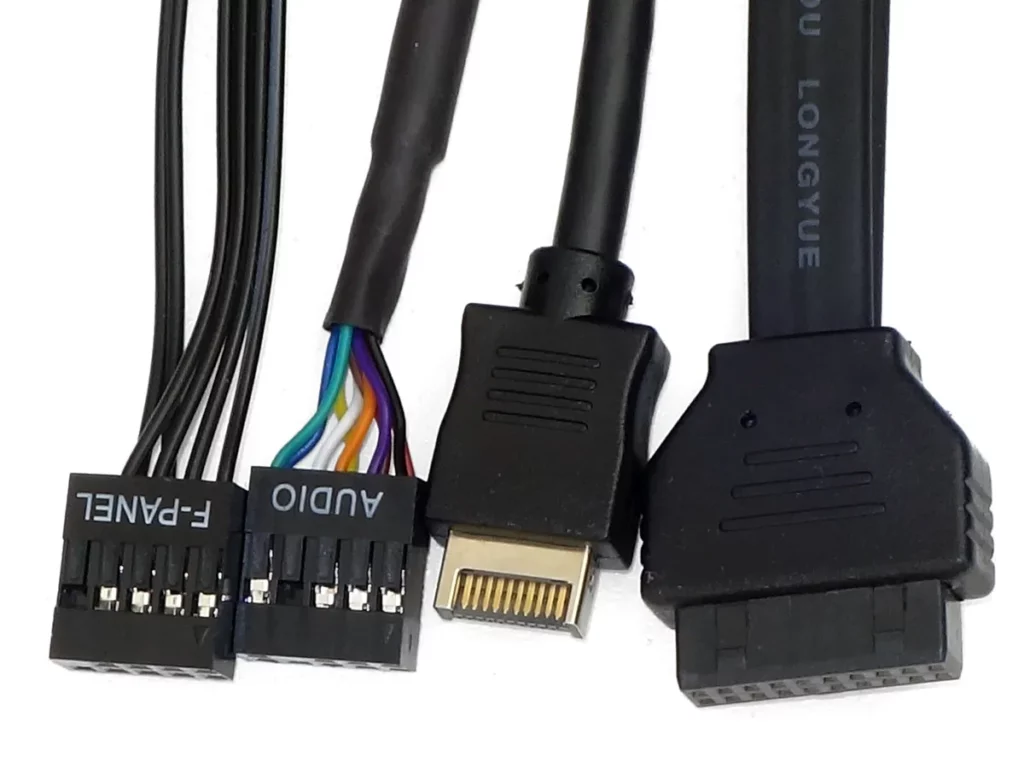
You saw the installation kit hidden within the drive cage, and here it is exposed: It includes a standoff and various screws to fit a motherboard, power supply and all drive mounts, in addition to cable ties and a breakout cable to help those who are using rare or outdated motherboards fit the case’s standard front-panel cable to individual power button, reset, and power LED headers.

Yes, we did say that the 2500X uses the now-standard one-piece front panel connector. It also includes HD Audio for the front panel headset combo jack, a Type-E cable to feed up to USB 3.2 Gen2x2 signals to the top-panel Type-C port, and a 19-pin USB3 cable to feed the two Type A ports. Spare no hyphens!
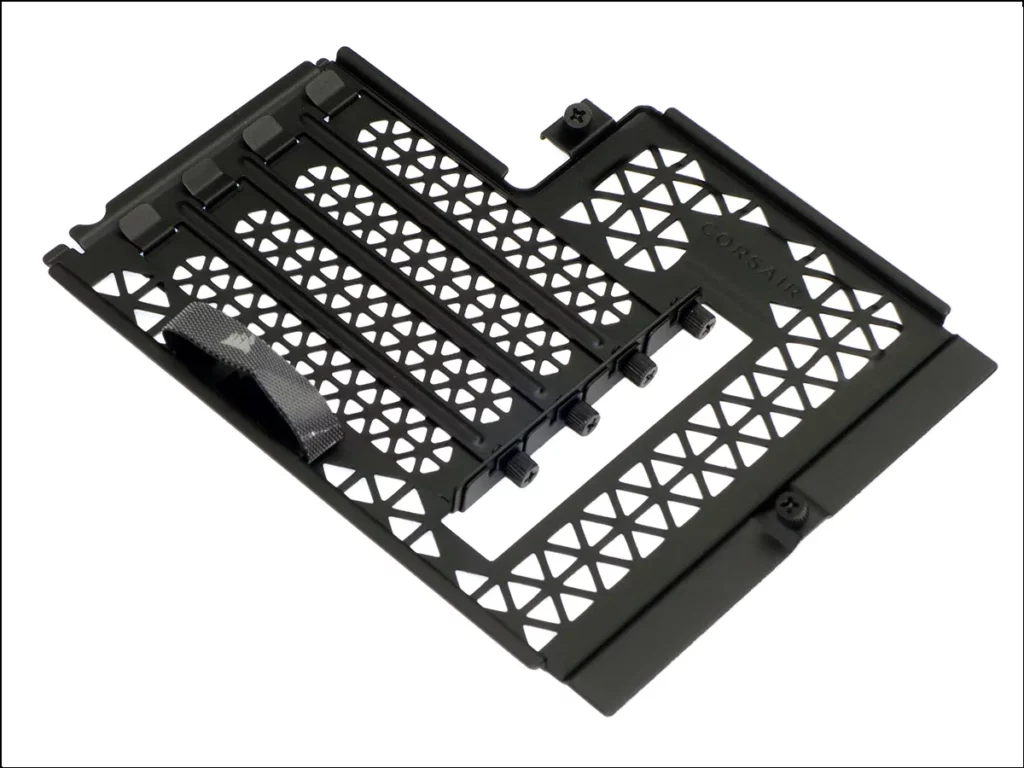
We have determined through previous builds that 19mm is the minimum screw tab passage width needed to allow the lower tabs of a graphics card to slide past the decorative plastic “shields” that cover the audio traces of some motherboards. The 2500X’s panel gives us less than 15mm. Fortunately, because it’s removeable it can also be tilted away from the case to free the card’s upper tabs from such obstructions.
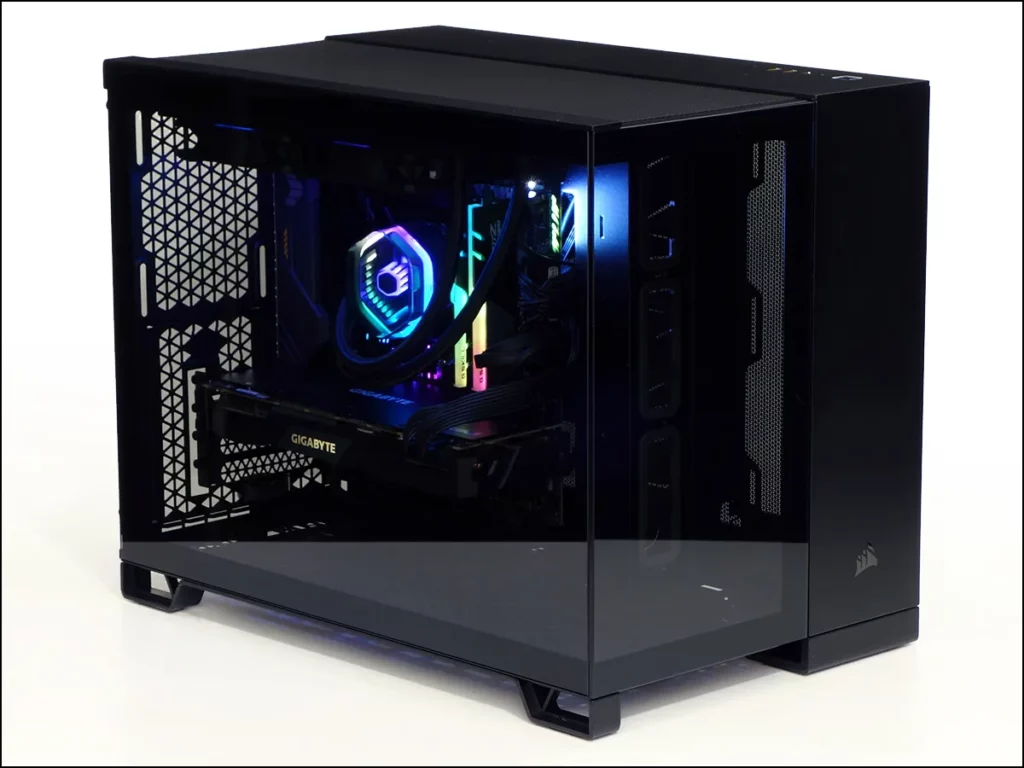
You may be surprised to learn that we choose the holes behind the motherboard, rather than the dedicated cable passages the feed into the side radiator bay, to rout our cables. We think it looks cleaner this way. We also mounted our closed-loop CPU cooler above the motherboard, rather than in the case’s dedicated 240mm-format cooler mount, because the top location allows it to cool our motherboard’s CPU voltage regulator. This is normal practice for our reviews.
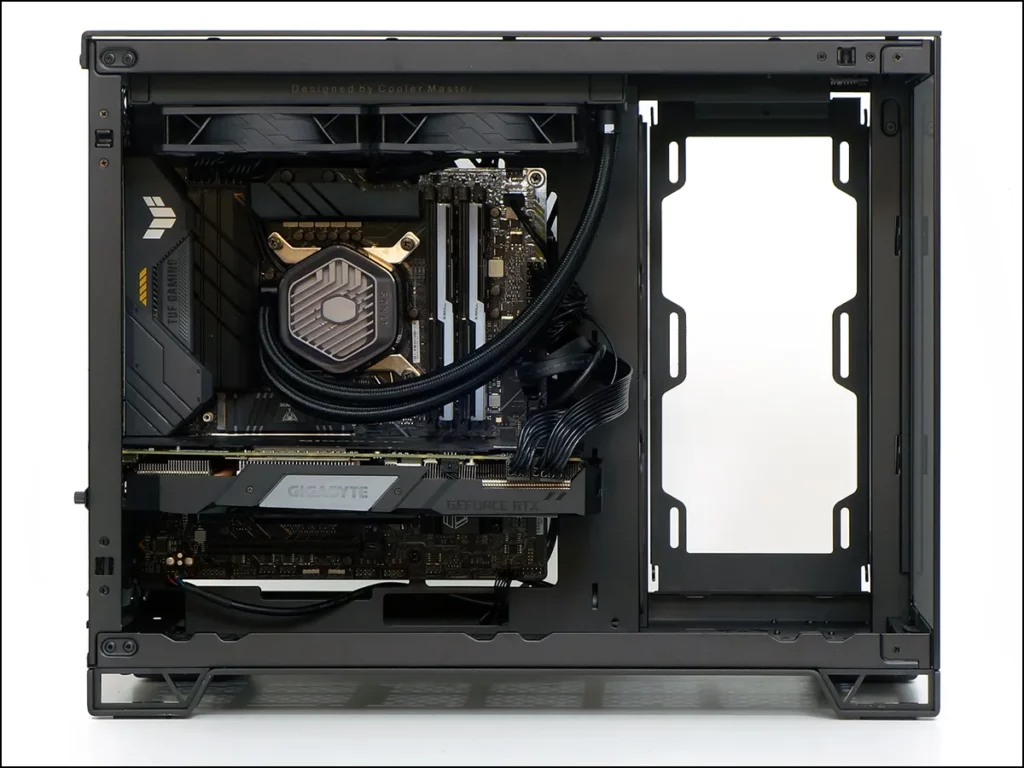
And now you can see why we didn’t want our cables to stick out from those forward-facing passage holes.
| System Configuration | |
| CPU | Intel Core i9-12900KF: 16C/24T, 3.2-5.2 GHz, 30 MB L3 Cache, LGA 1700 Fixed at 4.9GHz (P-cores, 3.7GHz E-cores) and 1.30V |
| CPU Cooler | Cooler Master MasterLiquid 240 Atmos closed-loop |
| Motherboard | Asus B660M Plus WiFi D4, BIOS 2402 (04/20/2023) |
| RAM | G.Skill TridentZ Neo DDR4-3600 C16, 2x 8GB |
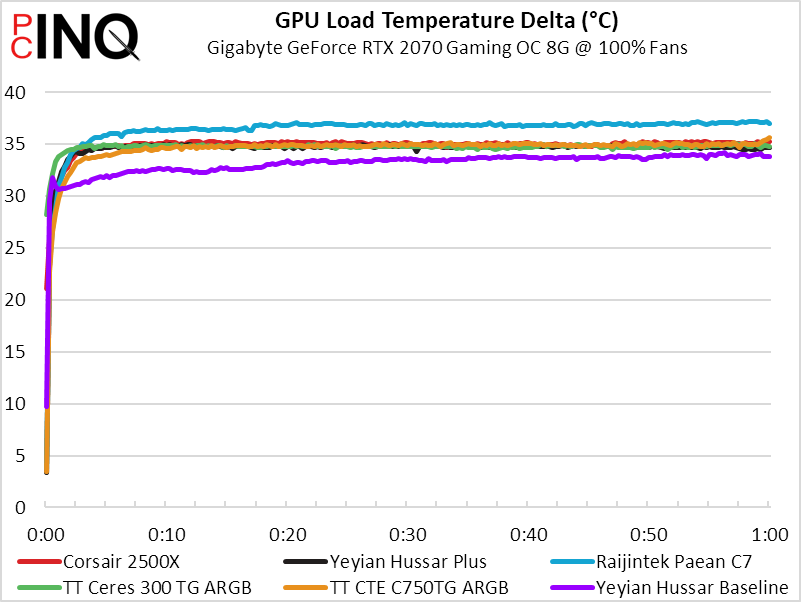
| Graphics | Gigabyte GeForce RTX 2070 Gaming OC 8G: GeForce RTX 2070 1815 MHz GPU, GDDR6-14000, Maximum Fan |
| Hard Drives | Patriot Viper VPR400 1.0 TB M.2 SSD |
| Power | Cooler Master V1100SFX Platinum: ATX 3.0 / 12VHPWR, 80Plus Platinum |
Test Results
Within that mess of colors we see a red line, meaning that the 2500X is almost perfectly in a tie for first place against four of the other five cases.
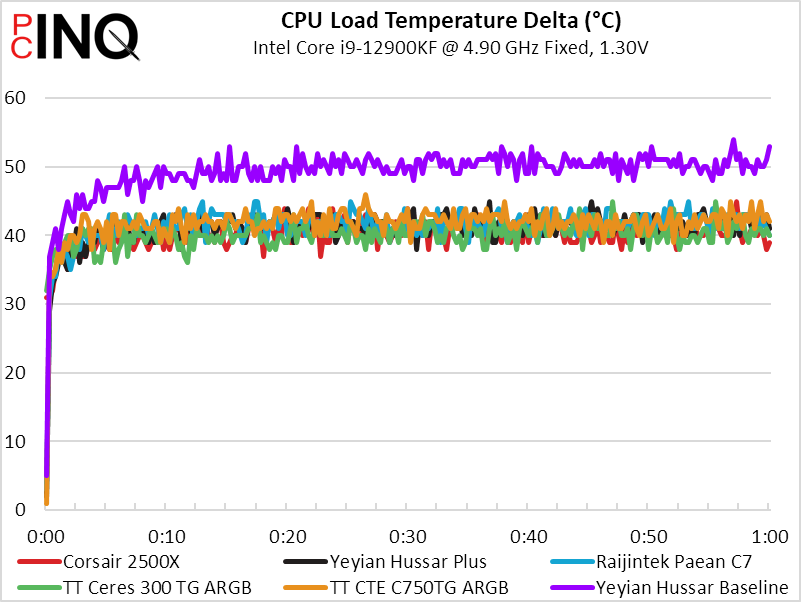
Our voltage regulator faired far worse in the 2500X, likely because it has no exhaust fan. The 2500X is stuck in a tie with the Paean C7 for last place.

GPU temperatures put the 2500X into a 4-way tie for second place which, when combined with its first place CPU temperature tie, looks reasonable.
Having no fans of its own helps the 2500X stay quiet for the most part, with its face and left side reflecting sound back into the case while the bottom and side vents let some of it back out.
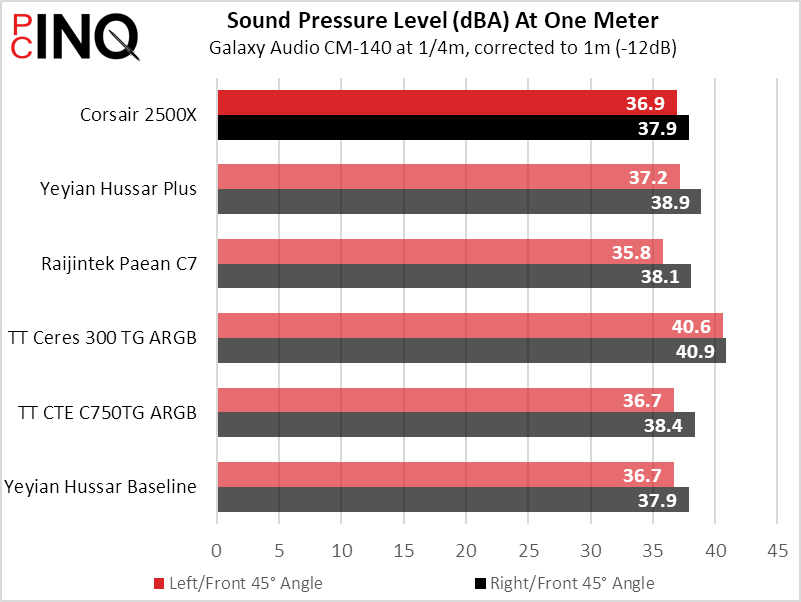
The 2500X CPU cooling-to-noise ratio takes second place behind the full-ATX Paean C7, but the voltage regulator temperatures of both of those models lost to the pack. Both dual-chamber cases are designed to hold multiple radiators, and both cry out for a full custom fan installation.

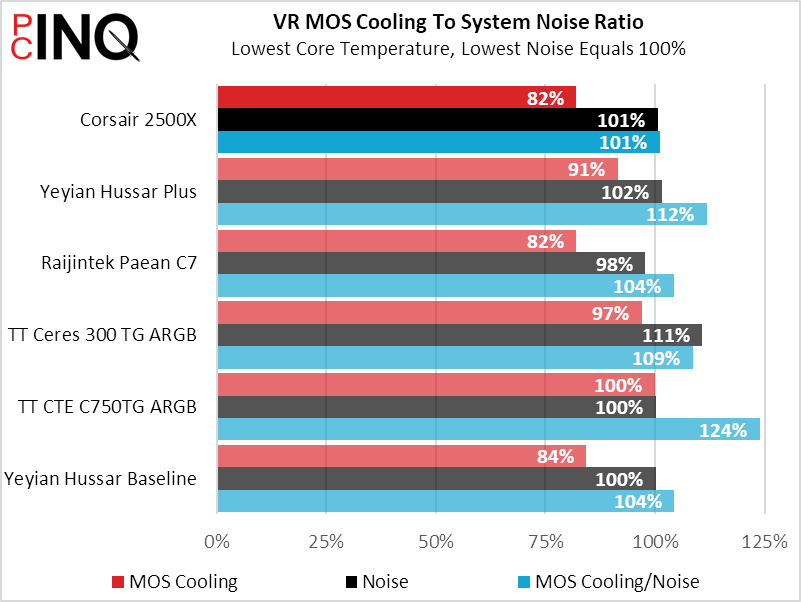
Both the 2500X and Paean C7 arrived without fans, and relying solely on our CPU cooler’s fans for airflow likely explains performance similarities. While both cases feature a dual-chamber design with the power supply mounted behind the motherboard, the Paean C7 supports larger (Full ATX) motherboards and the 2500X longer graphics cards. The 2500X is also a much larger case (~55L) compared to the Paean C7 (~50L), Moreover, the 2500X is designed to offer much more build flexibility to a much higher market.
Find it at Amazon
(click for availability)
High-market features include incredibly-thick 1/8” thick steel trim plates for the top and front, which were made this thick to allow for direct replacement with optional wood or aluminum trim kits. Its removable slot panel is designed to support Corsair’s vertical graphics card kit. And even though Corsair won’t admit it, the 2500X’s ability to fit three 140mm fans on the top and bottom could allow some builders to use 420mm-format radiators. Since there may be additional considerations that we haven’t noticed, we’ll leave those kinds of unsanctioned builds only to the most tenacious and talented builders.
| Corsair 2500X (2500X-BLK-PK) | |
| Pros: | Cons: |
| Supports hidden power connector motherboards. Alternative panels and vertical card brackets available. 460mm-deep interior fits long card and triple fans. Front slide-out dust filter for service convenience. | Pricey Side dust filter requires compressed air cleaning |
| The Verdict: | |
| A wide variety of available accessories, less popular form factor and relatively high barrier of entry combine to make the 2500X a potential candidate for unique builds. | |
The 2500X provides a realistic path to builders who want to assemble a unique combo without creating their own unique components.